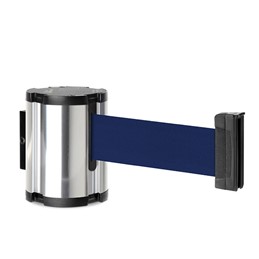


10-Foot Wall-Mounted Retractable Belt Barrier
Finish Setup Fee: |
Belt Setup Fee: |
Ships in: 3 Business Days |
83.00Ten-foot-long retractable belt barrier. Standard belt end. Includes Wall Receptacle (3011). Ideal for temporarily closing or blocking access to aisles, doorways and thresholds.


Ships in: 3 Business Days
Finish Setup Fee:
Belt Setup Fee:


DESCRIPTION

Advanced Retractable Belt Mechanism
- Our unique, viscous damping belt-braking system ensures a slow and safe retraction every time.
- Belt mechanism is easily replaced in the field using a screwdriver.
- Belt end connects to all major manufacturers' stanchions, as well as our Wall Receptacle (included).
Wall-mounted Retractable Belt Barriers give you all the benefits of a portable stanchion without taking up valuable floor space. Wall-mounted Safety Barriers attach to the wall with inconspicuous connectors. Simply twist the screw on the connector to release and move to another location. Ideal for cash register closures, or closing off aisles, corridors, and doorways for cleaning or safety. The retractable belt attaches to a wall receptacle (included) mounted on an opposing wall or directly to a portable stanchion. Includes all hardware.
Installation Guides:
Wall Mount Installation
-
STEP 1
Determine mounting height and location on wall for Grip Connector, making sure Grip Connector is vertical and that the top surface is level.
-
STEP 2
Install Grip Connector using two 1½" Flat Head Screws. Drywall anchors should be used if there is not a solid backing in the wall. Some mounting conditions may require different hardware.
-
STEP 3
Slide Wall Mount into dovetail on the Grip Connector until Grip Connector midpoint is aligned with Wall Mount Mechanism midpoint. Loosen Pan Head Screw on Grip Connector for an easier fit. Then, tighten the Pan Head Screw to secure the unit.
-
STEP 4
Mount the Wall Receptacle opposite from the Wall Mount using two 1½" Flat Head Screws. Make sure receptacle is level with belt and Wall Mount unit.
Belt End Replacement
BEFORE YOU START: Examine your new plastic Belt End carefully. It will arrive in two pieces. The Belt End Back piece has textured plastic that wraps around the back and a radius corner which should be oriented to the top. The Belt End Front piece has a dovetail shape that fits into the Beltrac post groove. The lip on the front piece should be oriented to the top.
IMPORTANT: The top edge of the Belt Ribbon and the top of the Belt End must be oriented “top-to-top” throughout assembly or the newly assembled Belt End will not work properly. "Mark" the top edge of the Belt Ribbon with a paperclip before knotting to ensure correct assembly.
-
STEP 1
Pull enough Belt Ribbon out from post to make a loose knot. This will keep it from retracting back into the unit and will make it easier to work with. Take note of the top edge of the Belt Ribbon and place a paper clip to mark the top.
-
STEP 2
Cut off the old Belt End and thread the Belt End Back piece onto the belt ribbon. Double-check that the radius corner and the belt ribbon are oriented to “TOP”. The radius corner should also be facing the unit.
-
STEP 3
Position Wedge in Crimping Tool so that the back edge sits against the screws. Feed the belt ribbon into the Wedge, making sure it is centered and fully seated to the back of the Wedge. Apply pressure with the Crimping Tool to secure.
-
STEP 4
Fold Ribbon/Wedge over and fit it snugly into the Belt End Back piece. Secure the Belt End Front piece to the Belt End Back piece using the 2 provided screws (there is only one way it will fit). Untie the knot and retract the belt to complete installation.
 SPEC SHEET: Beltrac Wall Mounts
 INSTALLATION SHEET: 10' and 15' Wall Mounts